


I hear a lot of complaints about rain sensors not working. Usually the problem is easily figured out. It’s important to understand what a rain sensor actually is and isn’t. The term ‘sensor’ itself is misleading. Rain sensors do not ‘sense’ rain. Merriam Webster defines ‘sensor’ as “a device that responds to a physical stimulus (as heat, light, sound, pressure, magnetism, or a particular motion) and transmits a resulting impulse (as for measurement or operating a control)”
This is not what a rain sensor does. Sticklers for accuracy in our field call them a ‘rain switch’, because it is a mechanical, not electronic, device that opens and closes a circuit- a switch. If you take one apart you’ll see this Rube Goldberg contraption is a spindle through some fibrous material discs- like a stack of 45’s on an old phonograph. When the discs get wet they expand like sponges and push down on the spindle spring loaded switch which opens the circuit to the common wire to all zone valves. The circuit loop is basically expanded from the controller terminal out to the rain switch and back. When the discs dry out, they shrink, and the spring closes the switch and continuity is returned to the circuit, allowing watering.
Now a wireless rain sensor is sort of like a sensor in that it sends a pulse or signal to a receiver at the controller, but the actual switch part that gets wet is the same mechanical device.
A lot of confusion surrounds the amount of rainfall needed to trip the switch. A light rain may not be enough to thoroughly wet the discs. You may see the system come on during a rain event. Remember also that a light rain might not amount to much water reaching the roots in the soil either.
Now lets troubleshoot the sensor, if we’re still convinced something is wrong.
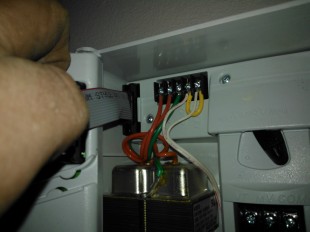
1. Make sure it’s wired correctly. Who installed it, a pro, or a DIY’er? If there is no bypass available, that’s a red flag that a DIY guy installed it. This is a picture of a controller where the installer left the yellow jumper wire intact at the sensor terminal, thus making the sensor useless.
.
If you’re not sure how it should be wired, call Crusty, or a pro irrigation tech.
2. Test for continuity. If you’re savvy with a multimeter you can test the leads at the controller. Disconnect them from the terminal before testing. If its dry outside you should get a short-circuit reading. If really wet you should get an open circuit. Then you should reverse the conditions to get the opposite reading. If dry, wet the sensor thoroughly to get an open reading. If wet, loosen the cap of the sensor, or remove so you can get a short circuit reading.
If you’re not savvy with a multimeter, when its dry outside turn on a zone within sight of the sensor. Get on a stepladder and push down on the spindle protruding from the top of the cap. The zone should shut off, and come back on when you release. Remember some valves are slow to close, it might take about half a minute. Also, some controllers like the Hunter Pro-C have weird behavior built into their software, where upon activating the sensor the controller will remain off for a longer soak period. It’s annoying when you’re trying to test them. I’m not a fan.
3. Location. How’s that ladder working out for you? Hopefully you didn’t need the help of the Fire Dept. to reach the sensor. I’ve seen yahoos install them on the highest peaks of a roof where routine maintenance is a discouraging task.
Everybody knows that rain sensors need to be installed where they will actually collect rainfall, right? Well I’ve seen otherwise. Make sure the sensor isn’t blocked by eaves, decks, narrow breezeways, or leafy trees. I shouldn’t insult everyone’s intelligence by reminding them not to install a sensor where sprinklers will hit it, but I will. A sensor should be installed anywhere rain freely falls and is relatively easy to get to by arm’s length or with a household stepladder.
Make sure the cap and spindle is pointing toward the sky! Over time the nuts on the arm holding the sensor may loosen, or the screws holding the bracket, and the whole thing droops or goes sideways. It’s not going to work unless the disc column is vertical receiving rain through the top of the cap.
4. Sensitivity and dry time adjustments. Most all sensor caps have adjustment notches that correspond with approximations of inches of rain needed to trip switch. You’ll see metric on one side and standard on the other, usually four options: 1/8″, 1/4″, 1/2″, and 3/4″. Make sure the cap is twisted and locked into a notch- if it’s loose it won’t work!
Most sensors also have a twisty collar at the base that either covers up or reveals the air vent, adjusting the speed of drying time and return to normal watering.
Which setting should you use? Well if you want more water to your plants go 3/4″ and open the vent all the way, less water go 1/8″ and close the vent. You’ll have to figure out your sweet spot. My default is to always go with the 1/8″ to save the most water, and dial back if needed.
5. Check for debris and disc condition. Twist open the cap and look inside the housing. This should be cleaned out every year. There’s usually bug guts, cobwebs, leaves, etc. that can collect there and interfere with the normal function of the discs. Now check the discs, are they moldy or misshapen? Over time they lose their expanding/ contracting function and the cap should be replaced.
6. Wireless sensors have watch batteries in them that may need to be checked/ replaced.
Lastly I would recommend replacing any rain sensor over 10 years old. The Irrigation Association has determined the average lifespan at 5 years, but I’ve seen them last longer than that. I hope I’ve helped you understand rain sensors and how they work.